Create your own key
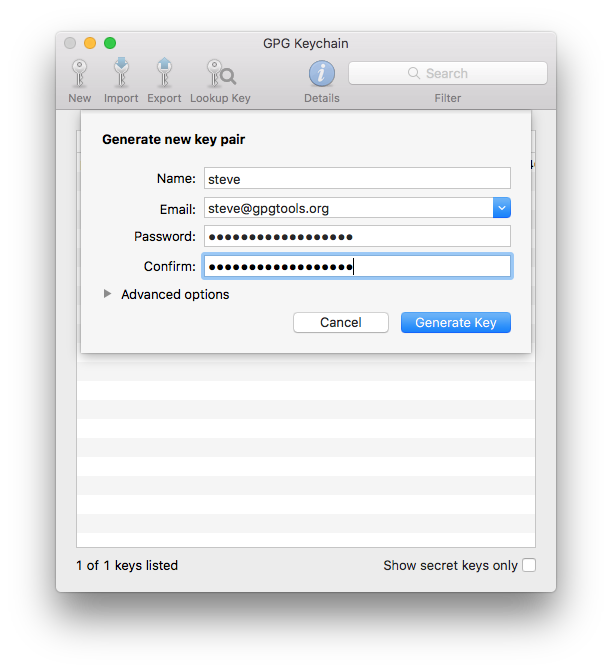
Enter your name and the email address you want to use your key with and you are ready to go.You don't have to bother with more advanced settings, we set good defaults for you.Upload your key to a key server so your friends can find it
When creating a key, you have the option to upload it to a key server, which makes it very easy for your friends to find and import it.Already an expert?
When creating a key, you can enable the advanced view, which let's you choose key size, expiration date and algorithm to use for your keys. Have full control over your keys.
It's all about the keys
To use GPG to encrypt and verify mails or files you and your friends need GPG keys.GPG Keychain Access let's you manage your own keys and find and import keys of your friends.Create your own key
Enter your name and the email address you want to use your key with and you are ready to go.You don't have to bother with more advanced settings, we set good defaults for you.Upload your key to a key server so your friends can find it
When creating a key, you have the option to upload it to a key server, which makes it very easy for your friends to find and import it.Already an expert?
When creating a key, you can enable the advanced view, which let's you choose key size, expiration date and algorithm to use for your keys. Have full control over your keys.

See all your keys
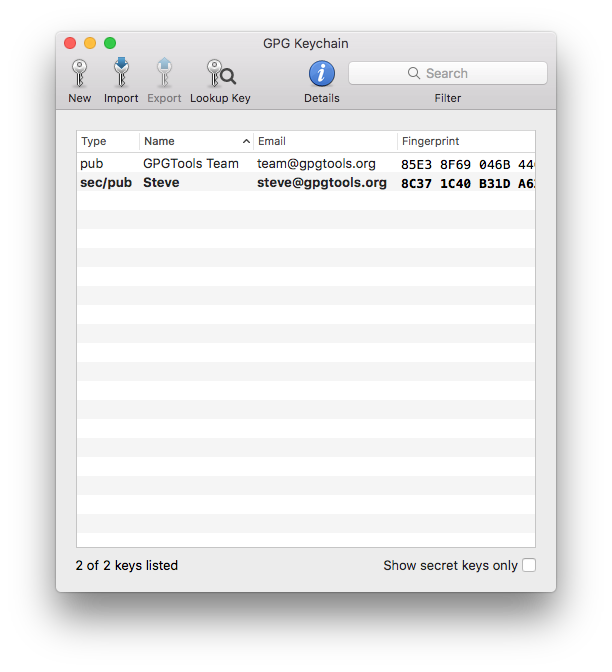
The main window of GPG Keychain Access shows you all your keys and the keys of your friends.Enable the "Show secret keys only" checkbox, to see only the keys you created.The toolbar
gives you quick access to the most important actions. Create a new key, import or export an existing key, or search for a specific key using the search field.More options
Select a key and right-click on it to bring up a context menu, letting you send your key to a key server, update or manage the details of your key.Add additional email addresses
Select your key and press the info button in the toolbar to add additional email addresses.
It's all about the keys
To use GPG to encrypt and verify mails or files you and your friends need GPG keys.GPG Keychain Access let's you manage your own keys and find and import keys of your friends.Create your own key
Enter your name and the email address you want to use your key with and you are ready to go.You don't have to bother with more advanced settings, we set good defaults for you.Upload your key to a key server so your friends can find it
When creating a key, you have the option to upload it to a key server, which makes it very easy for your friends to find and import it.Already an expert?
When creating a key, you can enable the advanced view, which let's you choose key size, expiration date and algorithm to use for your keys. Have full control over your keys.

See all your keys
The main window of GPG Keychain Access shows you all your keys and the keys of your friends.Enable the "Show secret keys only" checkbox, to see only the keys you created.The toolbar
gives you quick access to the most important actions. Create a new key, import or export an existing key, or search for a specific key using the search field.More options
Select a key and right-click on it to bring up a context menu, letting you send your key to a key server, update or manage the details of your key.Add additional email addresses
Select your key and press the info button in the toolbar to add additional email addresses.

Write secure messages with Mail
After installing GPG Suite, you'll see two new buttons when writing a new email: the lock button and the sign button next to it.The lock button
Activate the lock button to encrypt an email. Only you and the recipient will be able to read the contents of your message. Toggle between encrypting and not encrypting your email pressing ⌥ ⌘ Y.The sign button
Activate the sign button to sign an email. The recipient will be able to tell, that the email came from you and whether or not it was tampered with in any way.Toggle between signing and not signing your email pressing ⌥ ⌘ X.Choose between PGP and S/MIME
Using the security method indicator in the upper right corner, you can quickly switch between PGP and S/MIME. This is very handy if you use both.Press ⌥ ⌘ P to activate PGP or ⌥ ⌘ S to activate S/MIME.
It's all about the keys
To use GPG to encrypt and verify mails or files you and your friends need GPG keys.GPG Keychain Access let's you manage your own keys and find and import keys of your friends.Create your own key
Enter your name and the email address you want to use your key with and you are ready to go.You don't have to bother with more advanced settings, we set good defaults for you.Upload your key to a key server so your friends can find it
When creating a key, you have the option to upload it to a key server, which makes it very easy for your friends to find and import it.Already an expert?
When creating a key, you can enable the advanced view, which let's you choose key size, expiration date and algorithm to use for your keys. Have full control over your keys.

See all your keys
The main window of GPG Keychain Access shows you all your keys and the keys of your friends.Enable the "Show secret keys only" checkbox, to see only the keys you created.The toolbar
gives you quick access to the most important actions. Create a new key, import or export an existing key, or search for a specific key using the search field.More options
Select a key and right-click on it to bring up a context menu, letting you send your key to a key server, update or manage the details of your key.Add additional email addresses
Select your key and press the info button in the toolbar to add additional email addresses.

Write secure messages with Mail
After installing GPG Suite, you'll see two new buttons when writing a new email: the lock button and the sign button next to it.The lock button
Activate the lock button to encrypt an email. Only you and the recipient will be able to read the contents of your message. Toggle between encrypting and not encrypting your email pressing ⌥ ⌘ Y.The sign button
Activate the sign button to sign an email. The recipient will be able to tell, that the email came from you and whether or not it was tampered with in any way.Toggle between signing and not signing your email pressing ⌥ ⌘ X.Choose between PGP and S/MIME
Using the security method indicator in the upper right corner, you can quickly switch between PGP and S/MIME. This is very handy if you use both.Press ⌥ ⌘ P to activate PGP or ⌥ ⌘ S to activate S/MIME.

Receive secure messages with Mail
The "Security:" header will tell you, if the message you've received was signed or encrypted.If the message was successfully decrypted, you'll see an open lock. If the signature of the message is valid, you'll see a star icon with a checkmark.Make sure to click "Details" to see the security header.Signed messages
will show the email address associated with your friend's key that was used to sign this message.Click on the signature icon to see more infos regarding the key and signature.Encrypted or signed attachments
If the message contains encrypted or signed attachments, they will be automatically decrypted and verified. The attachments will look like any other non-encrypted attachments to you, while still being protected.
It's all about the keys
To use GPG to encrypt and verify mails or files you and your friends need GPG keys.GPG Keychain Access let's you manage your own keys and find and import keys of your friends.Create your own key
Enter your name and the email address you want to use your key with and you are ready to go.You don't have to bother with more advanced settings, we set good defaults for you.Upload your key to a key server so your friends can find it
When creating a key, you have the option to upload it to a key server, which makes it very easy for your friends to find and import it.Already an expert?
When creating a key, you can enable the advanced view, which let's you choose key size, expiration date and algorithm to use for your keys. Have full control over your keys.

See all your keys
The main window of GPG Keychain Access shows you all your keys and the keys of your friends.Enable the "Show secret keys only" checkbox, to see only the keys you created.The toolbar
gives you quick access to the most important actions. Create a new key, import or export an existing key, or search for a specific key using the search field.More options
Select a key and right-click on it to bring up a context menu, letting you send your key to a key server, update or manage the details of your key.Add additional email addresses
Select your key and press the info button in the toolbar to add additional email addresses.

Write secure messages with Mail
After installing GPG Suite, you'll see two new buttons when writing a new email: the lock button and the sign button next to it.The lock button
Activate the lock button to encrypt an email. Only you and the recipient will be able to read the contents of your message. Toggle between encrypting and not encrypting your email pressing ⌥ ⌘ Y.The sign button
Activate the sign button to sign an email. The recipient will be able to tell, that the email came from you and whether or not it was tampered with in any way.Toggle between signing and not signing your email pressing ⌥ ⌘ X.Choose between PGP and S/MIME
Using the security method indicator in the upper right corner, you can quickly switch between PGP and S/MIME. This is very handy if you use both.Press ⌥ ⌘ P to activate PGP or ⌥ ⌘ S to activate S/MIME.

Receive secure messages with Mail
The "Security:" header will tell you, if the message you've received was signed or encrypted.If the message was successfully decrypted, you'll see an open lock. If the signature of the message is valid, you'll see a star icon with a checkmark.Make sure to click "Details" to see the security header.Signed messages
will show the email address associated with your friend's key that was used to sign this message.Click on the signature icon to see more infos regarding the key and signature.Encrypted or signed attachments
If the message contains encrypted or signed attachments, they will be automatically decrypted and verified. The attachments will look like any other non-encrypted attachments to you, while still being protected.

Sometimes things go wrong
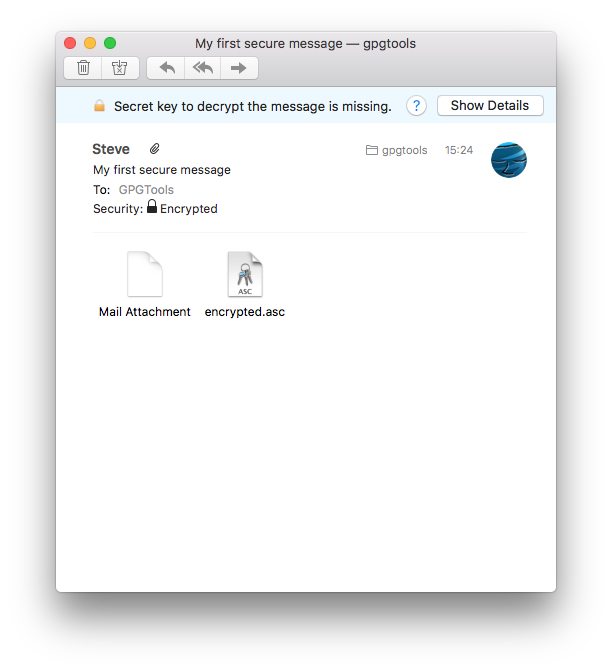
It might happen that someone encrypted a mail for another recipient but mistakenly sent it to you and so you're not able to read it. Or a signed message you're receiving was modified without your knowledge. Or anything else could have gone wrong. In these cases we're trying to be as helpful as possible by providing good explanations of what happened.Find out what went wrong
Whenever we detect that something's not right, you'll see a banner with an error message, letting you know what the problem is.To get detailed information about a problem, click on "Show Details" which contains a better description of the problem and possible solutions to it.
No comments:
Post a Comment